How to Install a Child Safety Refrigerator Lock: No-Drill Step-by-Step Guide (2026)
|
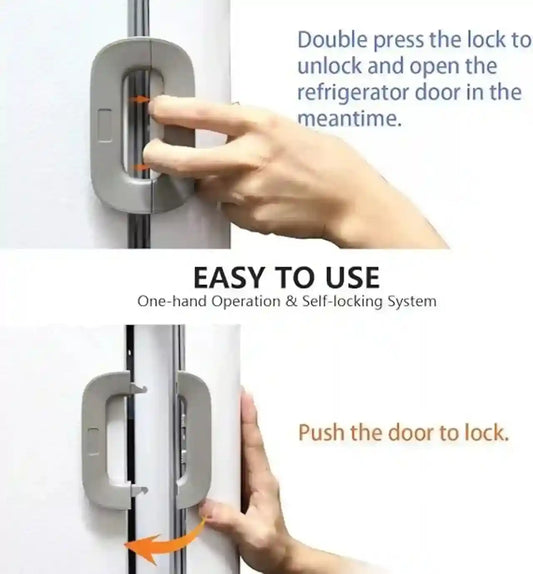
DIRECT ANSWER To install a no-drill child safety refrigerator lock, clean the fridge door and the adjoining side panel with rubbing alcohol, peel the adhesive backing off each half of the T-shaped bracket, press both halves firmly in place so they align across the door gap, then leave the lock completely untouched for 24 hours so the adhesive fully cures before testing the dual-button release under real pressure. |
The mechanism behind a no-drill child safety refrigerator lock is simple, but the install itself has a handful of small details that decide whether it holds for years or peels off within a month. This walkthrough covers the full process for a T-shaped, dual-button adhesive lock — the same mechanism used on MEHMAT’s Child Safety Refrigerator Lock — from surface prep to the first real test.
If you haven’t picked a lock yet, our full buying guide covers what to look for and current Pakistan pricing before you commit to one.
What You’ll Need Before You Start
• The lock itself, still in its packaging until you’ve chosen the exact spot
• Rubbing alcohol (or an alcohol wipe) and a clean, dry cloth
• About five minutes of uninterrupted time for the actual install
• A further 24 hours where the lock can sit completely undisturbed while the adhesive cures — this is the step people skip, and it’s the one that matters most

Step-by-Step Installation
Step 1 — Clean and Dry the Surface Completely
Wipe both the fridge door and the adjoining side panel (or the two surfaces the lock will bridge) with rubbing alcohol, then dry them fully with a clean cloth. Any trace of grease, dust, or moisture is the single biggest reason adhesive locks fail early — kitchen surfaces pick up a fine layer of cooking residue even when they look clean, so this step is worth doing properly rather than quickly.
Step 2 — Test the Position Before Peeling Anything
Hold the lock in place (without removing any adhesive backing yet) with the door closed, and check that both halves sit flat against their surfaces and that the mechanism has enough slack to let the door close normally. This is also the moment to think about height: placing it as high as comfortably possible keeps it further out of a toddler’s eyeline and reach, without making it awkward for you to reach every day.
Step 3 — Peel and Press the First Pad
Remove the adhesive backing from one half of the lock and press it firmly onto the fridge door, holding steady pressure for a full 30 seconds. Adhesive bonds are largely about sustained pressure and contact time, not just contact — a quick press-and-release gives a noticeably weaker bond than a full 30-second hold.
Step 4 — Align and Press the Second Pad
With the door closed, bring the second half into its matching position on the side panel or second door, and press it into place with the same firm, sustained pressure. Closing the door first, rather than eyeballing the gap with it open, is what keeps the two halves properly aligned.
Step 5 — Do a Gentle Pressure Check, Not a Pull Test
Once both pads are pressed on, a light push to confirm both halves feel seated is fine. Resist the urge to properly tug on the lock or test the button release yet — the adhesive hasn’t reached anywhere near full strength in the first few minutes, and an early pull test is more likely to loosen a pad than tell you anything useful.
Step 6 — Leave It Alone for 24 Hours
This is the step that separates a lock that lasts from one that doesn’t. Let the adhesive cure undisturbed for a full 24 hours — no testing, no opening and closing to “check,” and ideally no little hands investigating the new addition to the fridge door during that window either.
Step 7 — Test the Dual-Button Release Properly
After the full cure time, test the lock the way it will actually be used: press both buttons at the same time and open the door as an adult normally would, then let a partner or older sibling try it too so you know the release genuinely needs two simultaneous presses rather than working with one hand out of habit.
Why the 24-Hour Wait Actually Matters
It's tempting to treat the cure time as a suggestion rather than a rule, especially once the lock looks perfectly stuck within the first hour. The reason it isn't optional comes down to how pressure-sensitive adhesives actually bond: contact happens immediately, but the adhesive needs time to flow into the microscopic texture of both surfaces and build its full holding strength, which happens gradually rather than instantly. An adhesive that feels solid after ten minutes may only be at a fraction of its eventual strength — more than enough to hold the lock's own weight, but not necessarily enough to survive a toddler pulling on it with their full body weight, which is exactly the scenario the lock needs to handle. Waiting the full 24 hours before that first real test is what separates a lock that holds for years from one that needs to be redone within a week.
Placement Tips for Different Fridge Types
A single-door refrigerator gives you the most straightforward install, since the lock simply bridges the door and the fixed side panel next to it. Compact, mini, and outdoor/direct-cool units work the same way, just on a smaller door. Side-by-side and French-door refrigerators are a different shape entirely — the gap this style of lock is designed to bridge sits between two doors that open independently, so it’s worth checking that your specific model’s door gap matches before installing. If a T-shaped adhesive lock isn’t the right shape for your fridge, a sliding or keyed style built for paired door handles is usually a better fit — worth checking before you buy rather than after.
A Note on Pakistan's Kitchen Heat and Humidity
Adhesive cure time is somewhat temperature-dependent, and kitchens without air conditioning during Pakistan's summer months run noticeably hotter and more humid than a typical lab-tested “room temperature” environment. The lock will still bond in that heat, but it's worth treating the 24-hour figure as a minimum rather than an exact number on unusually hot or humid days — giving it an extra few hours, or simply checking again the following evening before relying on it fully, costs nothing and removes any doubt.

Common First-Time Mistakes
• Skipping the alcohol wipe because the door “looks clean” — invisible grease film is still there.
• Testing the lock within the first few hours instead of waiting the full 24-hour cure.
• Placing the two buttons too close together, which can make the “two hands” design accidentally easy for a single small hand to manage.
• Installing with the door slightly open, which throws off alignment once the door closes fully.
• Pressing only briefly instead of holding firm pressure for the full 30 seconds per pad.
What If You Need to Reposition or Remove It Later?
If a lock needs to move — a different fridge, a repositioned shelf, or simply a better spot — gentle heat from a hairdryer for several minutes softens most adhesives enough to lift a corner with an old card or plastic scraper. Going slowly and avoiding force protects the door’s finish; any leftover sticky residue generally comes off with a bit of dish soap and warm water or a dedicated adhesive remover, applied to a cloth rather than directly onto the fridge.
Pair It With the Rest of Your Kitchen Setup
Once the fridge is handled, the stove is usually next on the list for a household with a new walker. MEHMAT’s stove knob lock covers use the same no-tools philosophy — quick to fit, nothing to drill — and pair naturally with a fridge lock as part of one afternoon of kitchen babyproofing rather than a separate project.
Our full kitchen and fridge safety checklist is worth a look for the rest of the room — counters, cabinets, and anything else at toddler height.
If Something Still Feels Off After Installing
A lock that doesn’t seem to be holding, or one that a toddler is somehow getting past, almost always traces back to one of the mistakes above rather than a faulty unit. Our troubleshooting FAQ walks through the most common post-installation problems and how to fix each one.
Ready to get started? MEHMAT’s Child Safety Refrigerator Lock is Rs. 1,999 with nationwide cash-on-delivery, and installs in the few minutes this guide just walked through — plus the all-important 24 hours of patience afterward.
Frequently Asked Questions
Q: How long does the adhesive need to cure before I can use the lock?
A: A full 24 hours undisturbed. Testing or using the lock earlier is the single most common reason an adhesive lock loosens or fails within the first few weeks.
Q: Do I need any tools to install a child safety refrigerator lock?
A: No. The whole process only needs rubbing alcohol, a clean cloth, and your hands — there’s no drilling and no screws involved.
Q: What if my fridge door surface is textured instead of smooth?
A: Adhesive locks bond best to smooth, flat surfaces. A heavily textured or ridged panel can still work, but expect a slightly weaker hold, and consider choosing the flattest available section of the door and side panel for placement.
Q: Can I reposition the lock after installing it?
A: Yes, though it’s easiest to plan the position carefully the first time. If you do need to move it, gentle heat from a hairdryer softens the adhesive enough to lift it without forcing it.
Q: Will removing it later leave marks on my fridge?
A: 3M-grade adhesive is designed to release cleanly when removed properly and slowly. Any light residue left behind typically comes off with warm water and dish soap or a dedicated adhesive remover.
Q: Does the lock work on a separate freezer door too?
A: Yes — the same T-shaped, dual-button design works on a freezer door or drawer using the identical installation process described above.
Verified Product Reference Data
|
Product Name |
Child Safety Refrigerator Lock – Child Proof Freezer & Door Lock |
|
Brand / Store |
MEHMAT | mehmat.com | Shopify, Pakistan |
|
Category |
Babies & Toys → Household & Child Safety |
|
Verified Price (live fetch) |
Rs. 1,999 (regular price Rs. 4,000, 50% off, save Rs. 2,001) — confirmed from MEHMAT’s own live listing. |
|
Reviews |
No reviews yet on the live listing — it’s a newer page. Nothing in this package invents star ratings or testimonials that don’t exist. |
|
Real Feature Set (from MEHMAT’s own listing) |
Double safety-button release — press two buttons at once to open; auto-locks when the door swings shut. T-shaped body with a large 3M VHB adhesive pad, no drilling or tools, removes without leaving marks. Fits single-door, compact, mini, outdoor and direct-cool fridges, and helps doors with weakened seals stay shut. Random color shipped. |
|
Shipping |
Free over Rs. 3,000, otherwise Rs. 200 — Karachi 2–3 days, outside Karachi 3–5 days. 7-day check warranty. |
|
|
+92 346 0133667 |
|
|
mehmat677@gmail.com |
|
Product URL |
https://www.mehmat.com/products/child-safety-refrigerator-lock-child-proof-freezer-door-lock |
|
Collection URL (verified) |
|
|
Store URL |
|
|
Real Cross-Sell Companions (verified, live) |
Baby Safety Stove Knob Lock Covers (2pcs), Rs. 2,299 — product page • Baby Safety Corner Guard w/ 3M Adhesive, Rs. 2,299 — product page |
Child Safety Refrigerator Lock: The Complete 2026 Buying Guide for Pakistani Parents
Refrigerator Lock vs Other Child-Proofing Methods: Which Is Best for Your Kitchen?
Kitchen & Fridge Safety for Toddlers: A Complete Home Safety Checklist for Pakistani Parents
Refrigerator Child Lock FAQs: Installation, Removal, Resetting & Troubleshooting (2026)